23 October, 2013

baking up a storm in an allergic house (aka keeping it simple: The Humble Scone)


Hi there!

So, have I told you that I love to bake. Love it! With my three cheeky rascals keeping me, well, busy, I often don't have the time I would love to have to make stuff. But, baking, well, that's a different story! The boys love to help out, and I love the feeling of having created something, even if in the kitchen, rather than my crafty space. Add to that the challenge of finding great recipes that are both egg and nut-free (or at least adaptable), and I am in.

So lately we have had an awful lot of playdates, which has been lovely! And a great excuse to bake! There are a few favourite treats I have been taking along, but this has been the hit. It's funny, I'm not sure if it is the same everywhere else, but in Australia there seems to be this great mythology about The Perfect Scone. So if you bakes scones, and they do not resemble hard, crumbly small rocks, you are crowned as somewhat of a baking superhero/goddess.

I wonder if it has anything to do with the Australian Country Womens Association, who used to pride themselves on leading the way in all things baking...

Anyhoo, this recipe for me, has been a never-fail. So I thought I would share it here.

Before I start, I need to acknowledge that this is a tweak of a recipe from someone else. I have a small piece of notepaper taped into the back of my recipe book, with a version of this recipe - no name, and I have no recollection of where it came from, although I have a suspicion it may have come from a Val or a Sylvia.


The Humble Scone

3 cups SR flour
1 cup cream
1 cup sparkling water

(Disclaimer: I am not a baker! I am not a cook. I am a mum who is starting to bake the basics, and loving it. And I want to share the joy. I hope you have luck with the recipe, and if not, tweak it until it is your own.)

Preheat your oven to 220C.

Mix all your ingredients just until combined (don't overdo it) - the dough will be wet and sticky. Pop the dough out onto a floured bench, give it a bit of a gentle fold over until the dough feels good, you know, doughy. You don't want to give it a hard knead - just a gentle fold over. Next steps, don't roll the dough, just lightly pat it down. Cut it out, using round cutter or plastic cups (with a plastics drawer that is very accessible to a one year old, we have to make do with whatever we can still find in the kitchen!). We usually get between nine and twelve scones out of one batch of mix, depending on which cutter we use. Pop in the oven 15 mins in a preheated oven at 220C.

When you're done, take them out, let them cool for as short a time as you can manage, spoon on some local jam and yummo! You're done.

Have fun xx

13 October, 2013

Whip up a market bag!


Got some sewing in last night (after the duelling laptop date with Mr Pickles - him studying, me working). A new market bag! This one was made from a vintage double Sheridan sheet I picked up for $1. It looks unimpressive in the photo, but once you start to fill this thing it suddenly becomes enormous! I love it - hope everyone else does too, this may just become my go-to home-sewn gift...

The tutorial's here, via Whip Up and by the amazing Alexandra from Lola Nova.

The tutorial's very simple, very clear, and the sewing EASY. Love it!

Back soon xx

07 October, 2013

the gherkin - getting older


The Gherkin has his first day of his last term at preschool tomorrow. Can't believe it - where has the time has gone? His next holidays will be the ones before Big School [gulp].

He is such a delight! Funny, loving, quirky, smart, gorgeous, lovely boy. This is him intentionally photobombing as I was trying to snap Baby on the beach. It's become a new (hilarious) joke of his. Love it. Cheeky monkey.

xx

04 October, 2013

the pom pom party - the credits

Hi there! So there has been a little bit of interest in the pom pom party, which I had not quite expected!


I wanted to post about where I got the various ideas I pulled together for the party....

I have been collecting party ideas since I started out on Pinterest, and my party board is constantly being updated. I follow people who I know have brilliant party ideas and repin them as they pop up. As well, some clever bloggers I follow throw fantastic parties  - I pin their ideas too! My aim is just to make a collection of great ideas that I can use as a resource later.

So initially, I wanted to throw my one year old a confetti party, but it all just started to feel too tricky. Then my very brilliant designer sister in law decided she was throwing a rainbow party for her son (only a week older than Baby Pickles), so I decided to shift away from confetti.

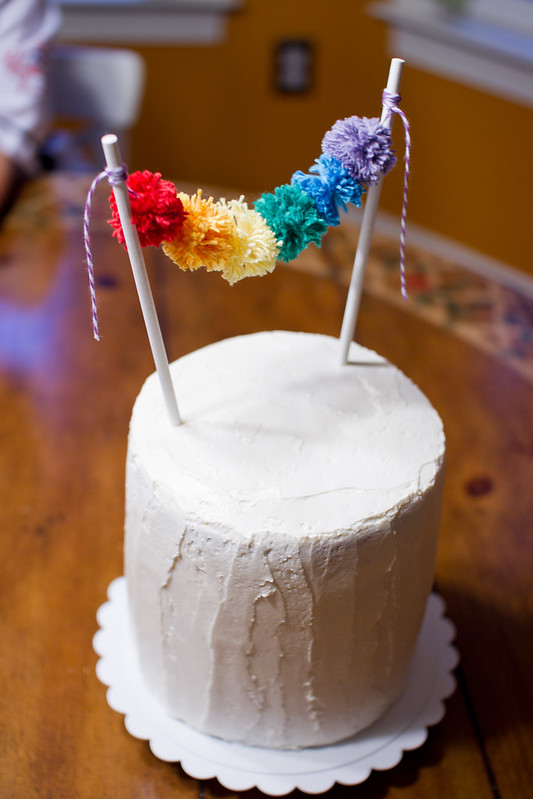
So pom pom it was! I decided to stick with the confetti -funfetti?- cake, but add pom poms. I had pinned a number of these, but this one was probably my favourite, as I also loved the finish on the icing on the cake.

Rainbow Birthday Cake
 
After some how to ice a cake advice from this blog, and adding in sprinkles in between the three layers, a pom pom cake topper, and a cute vintage thrifted deer, my Baby's cake was done!


Okay, so the next thing: the baby banner! This idea was a direct copy from Stephanie at Simply Radiant . I tried to include one photo from each month of Baby's life and include different faces - happy, sad, funny etc... I was really happy with how this had turned out, and it is now hanging across the wall in Baby's room.

I had a bowl of pom poms on the table, just for the cute look, and then we had those big paper poms hanging from the trees - we can pick these up here really cheaply in $2/bargain shops.

Of course, we are so lucky to have such a beautiful garden, and it was such a beautiful day! It was only at the last second that I decided to pull out the "Christmas linen", which is why it has very clearly not been ironed! (Come on, I may be crafty, but I am not superwoman!) I wish I had thought of that a touch earlier.

I will pop up the printable thingy that I made to go in the party bags for the kids to take home with their pom poms, some time in the next week (or so).

Take care, happy crafting xx


01 October, 2013

stop! hammer time.

Yippee! Who could forget hammer time. Just found the best pattern for hammer pants (aka harem pants, parachute pants, etc...).

I had started on some hammer pants some time ago, but then had an extended adventure in the land of unpicking as I had actually made the waist/crotch too long, and had tried to be really clever and attach a separate waistband, before I tried the pants on Baby Pickles. I'm not sure I am using the right terminology here, but let's just say that the waistband came up to his armpits - seriously not cool. If only I had used a pattern, I may have saved myself a rare and precious spare hour.

Here is Baby Pickles in all his hammer pants glory.


Apparently, hammer pants are an all-weather pant (!) and perfect for days that might include: trips to the park, eating raw potatoes straight from the vege patch, and hanging out with pugs. (Apologies for the photo quality - there's only so much an early-noughties, pug-chewed phone will do).
 
These were made from a fantastic vintage homewares (curtain?) fabric I found for just 50 cents at one of my very favourite local opshops. The opshop is a complete mess, but has some real gems if you are willing to spend time sorting, especially in the fabric and books section. The thrill of the chase! I thought I was really clever making these without a pattern, but the time it took to work it all out! I did like the little detail I did on the outside left leg, which was really just a loop of fabric stitched on (you can just make it out on the potato shot), but made them look a little more special...

Next time, I fully intend to go down the sewing from a pattern path - I could use the pattern I made whilst making these, but how cool are these pants via suburbia soup? And with a free pattern download to boot! Love it.


Watch this space for more Baby Pickles in hammer pants action xx

ps. after using the word hammer seven times in the one post I thought it may be illegal not to link here


Thanks

to my other half who puts up with the mess, makes me happy and keeps me sane.
to my beautiful boys who give me so much i want to remember and make the everyday something to treasure.
to my mum who alway let me play with fabric and the good scissors, and who knows a lot of songs.
to my dad who was always happy for us to make a mess and who laughs at us when we deserve it.
to both parents for making sure i still got the work done.
to my dear friends for listening and for sharing the laughs.
and, to you for visiting!